This document outlines how to navigate and use features of the EFIS 2.0 File Download Portal.
The EFIS Download Portal is a repository of files which the ministry makes available to school boards on a regular basis. It contains files that were historically accessed through the Facilitating Documents folders in the ministry's EFIS 2.0 system. The portal also contains school boards' financial data, which was historically sent out via CD-ROM to its stakeholders. The portal includes data related to the four most recent years.
1 Logging In
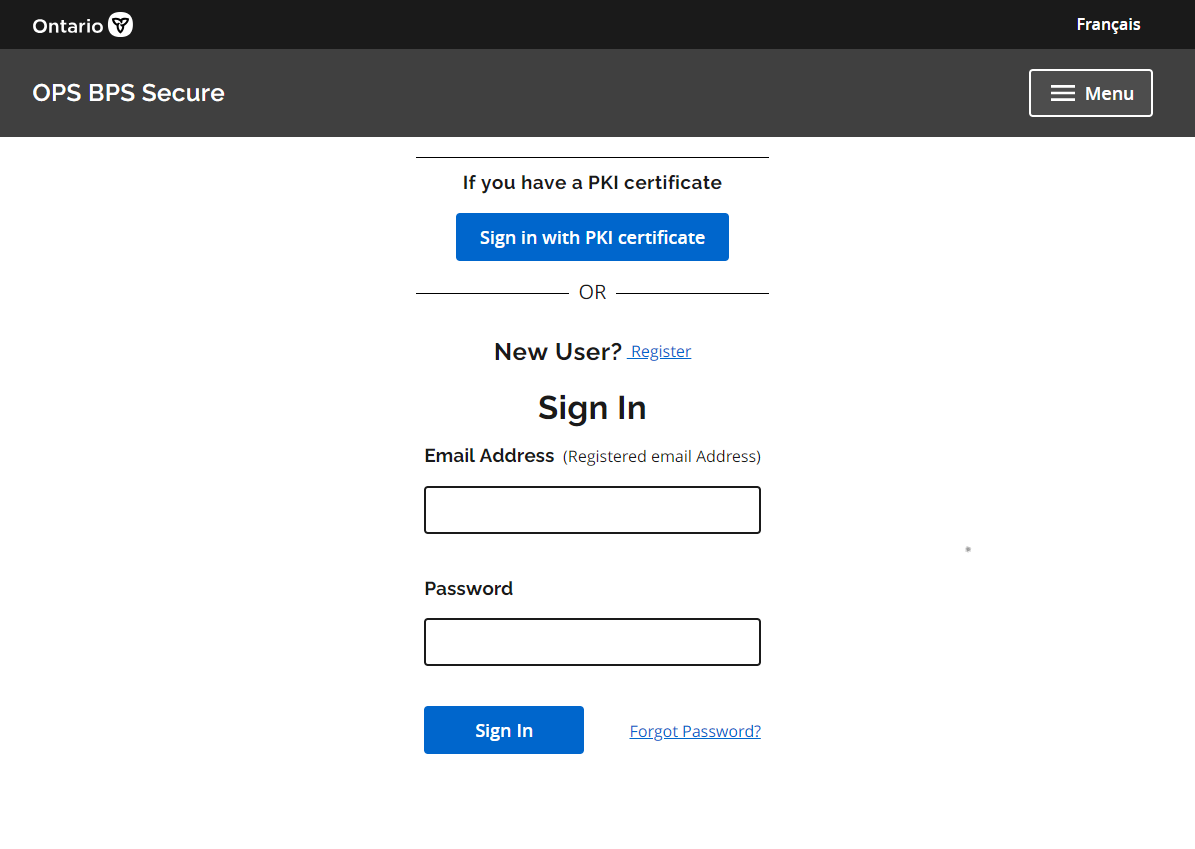
In order to log into the EFIS File Download Portal, you must be registered for GO Secure; if you have not yet registered please follow the instructions in the Registration Guide. Once registered, visit the EFIS URL. The EFIS URL link will redirect to an OPS BPS Secure login page. Login with your email and password. If you have a PKI certificate instead, click Login with your certificate.
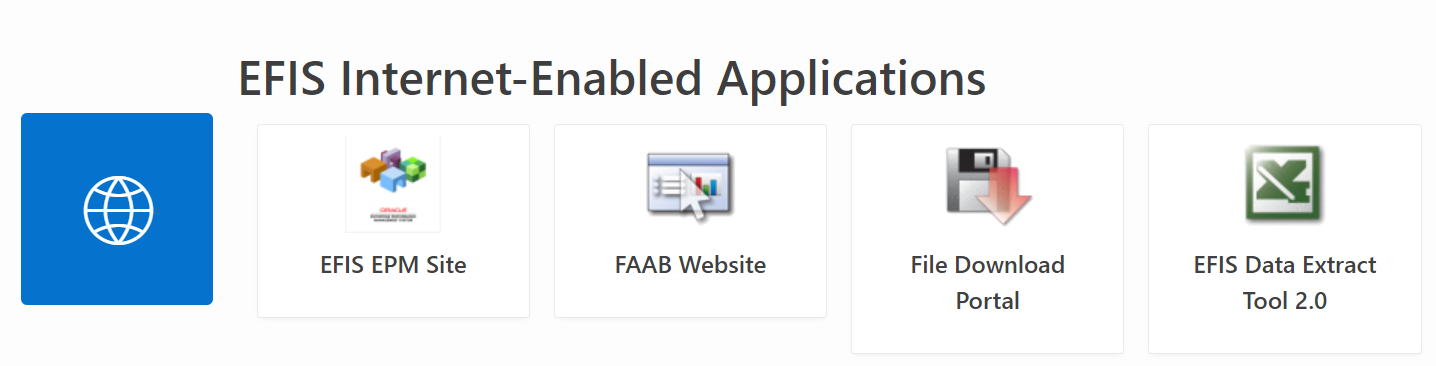
Once you sign in, you'll be sent to the EFIS homepage. Click on File Download Portal.
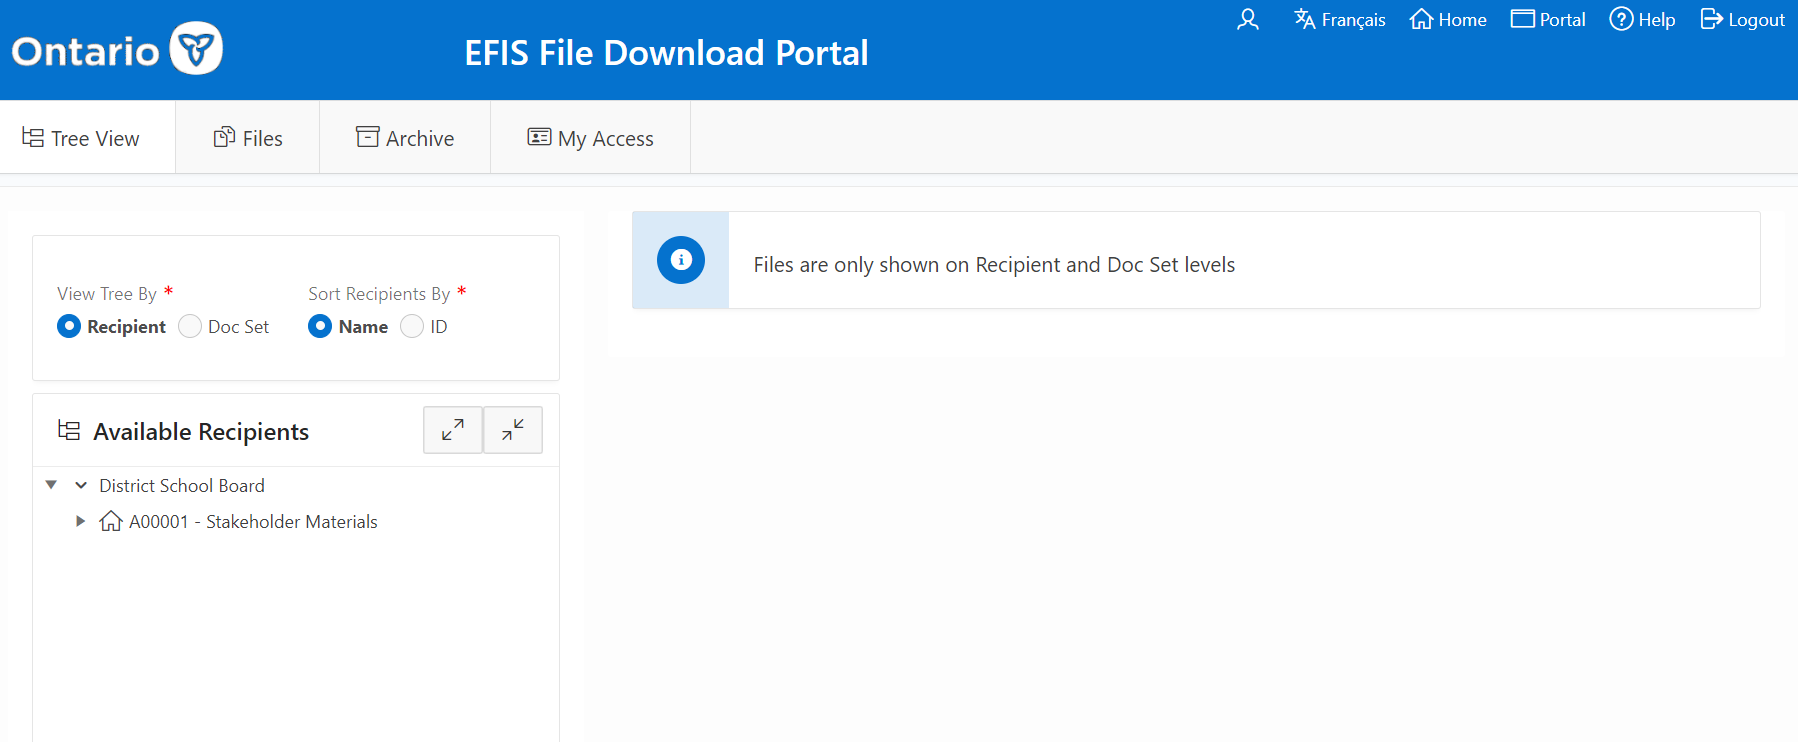
You'll be sent to the FDP (File Download Portal) homepage.
2 File Organization and Navigation
There are two ways for a user to view the files that they have access to in the portal. On top of the files being organized in these ways, the user has the ability to search, filter and sort the results they see on each of the screen. The details of these features are described in the following sections.
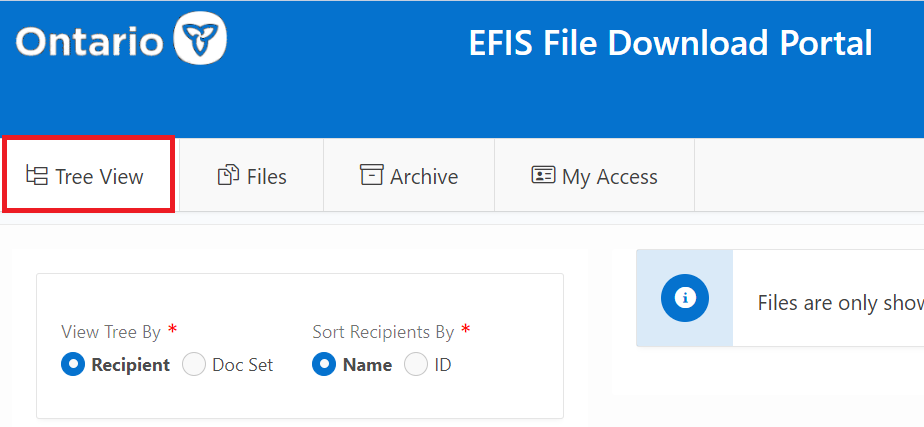
2.1 Tree View Tab
The Tree View, which is the default tab of the portal, is where the files that the user has access to are organized in a hierarchical folder view.
In order to access the needed files, the user must navigate through the different folders. The navigation can be done by single clicking the little arrow to the left of each folder.

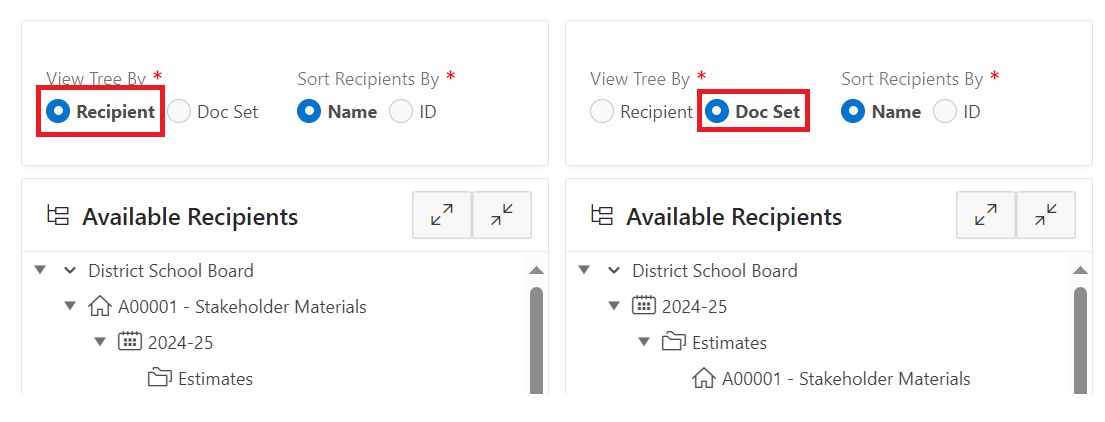
Clicking the "Expand All" button will display all the different folders available, and "Collapse All" will collapse back to top level. The image on the left is the behaviour of the "Expand All" button, while the right is that of the "Collapse All" button.

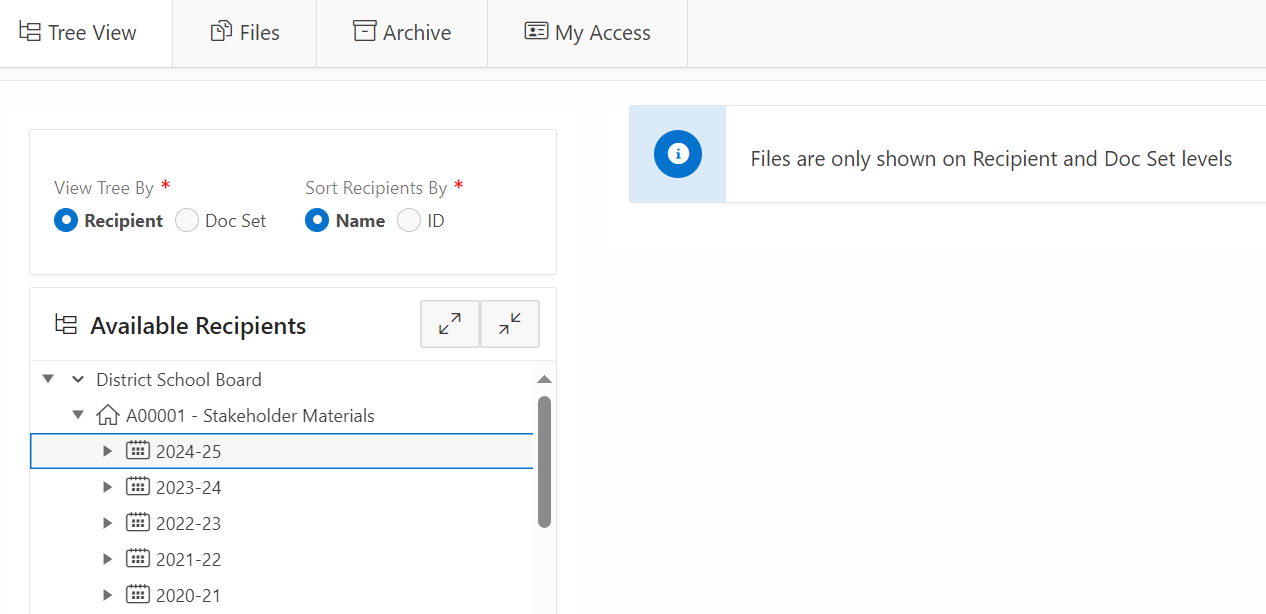
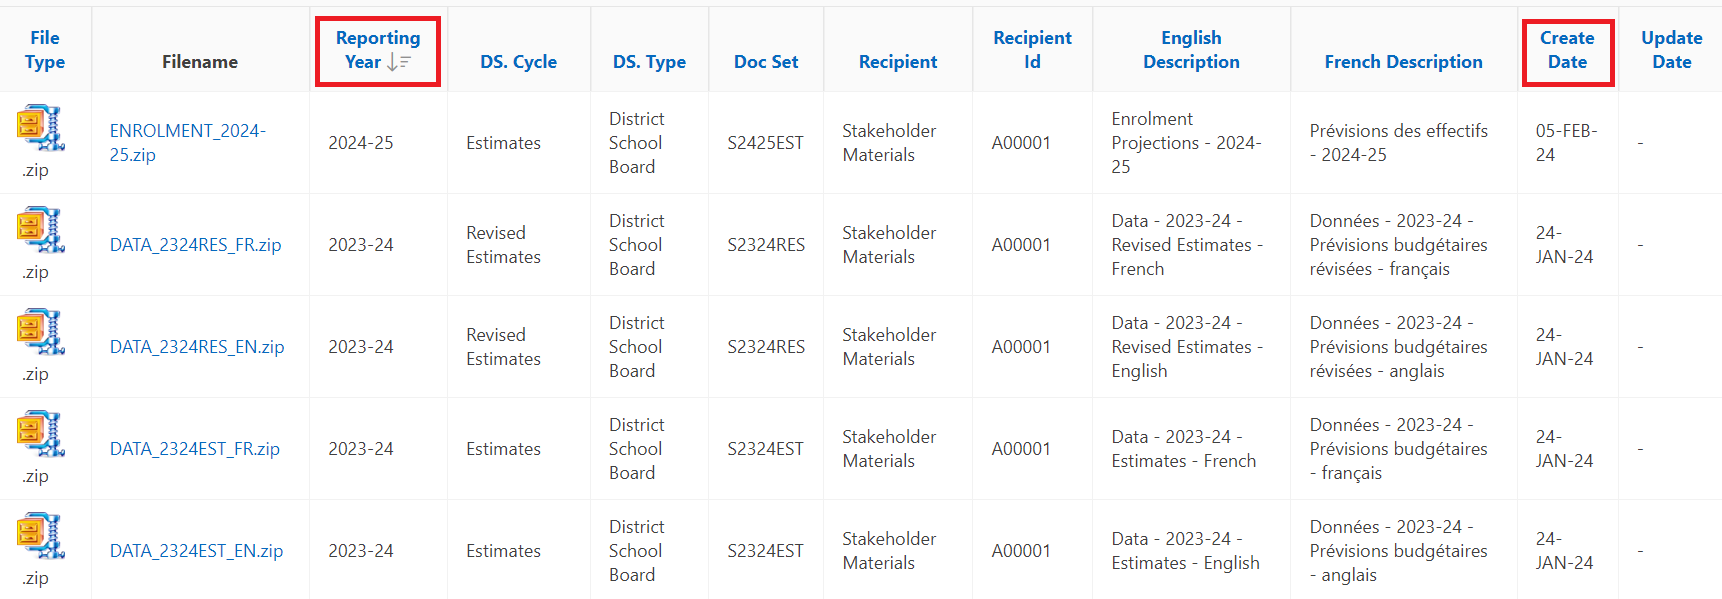
The files contained in the folders are only shown at the Recipient and Doc Set levels. The recipient refers to the District School Board (or collection of District School Boards) and the Doc Set (Document Set) refers to the combination of School Year and Cycle (e.g. 2024-25 Estimates). Please note: the stakeholder data is published together for all District School Boards and thus the only recipient available will be "A00001 - Stakeholder Materials".
The tree view can be sorted in two different ways: By Recipient (Recipient > School Year > Cycle) or by Doc Set (School Year > Cycle > Recipient).
Note!
After having sorted the tree view, users can also sort the recipients by their name or ID. If name is selected, the order of recipients will go alphabetically, (i.e. Algoma, Algonquin, Bluewater...) while ID means that the recipients will go in order of increasing ID number (i.e. A00001, A00002, B00001...).
Files available for download are only accessible at two levels of the tree view: Recipient and Doc Set. This means that in order to see the files available the user must navigate to the correct level. For example, if the user navigates to just 2024-2025, they will not see any files and will get a message stating "Files are only shown on Recipient and Doc Set levels".
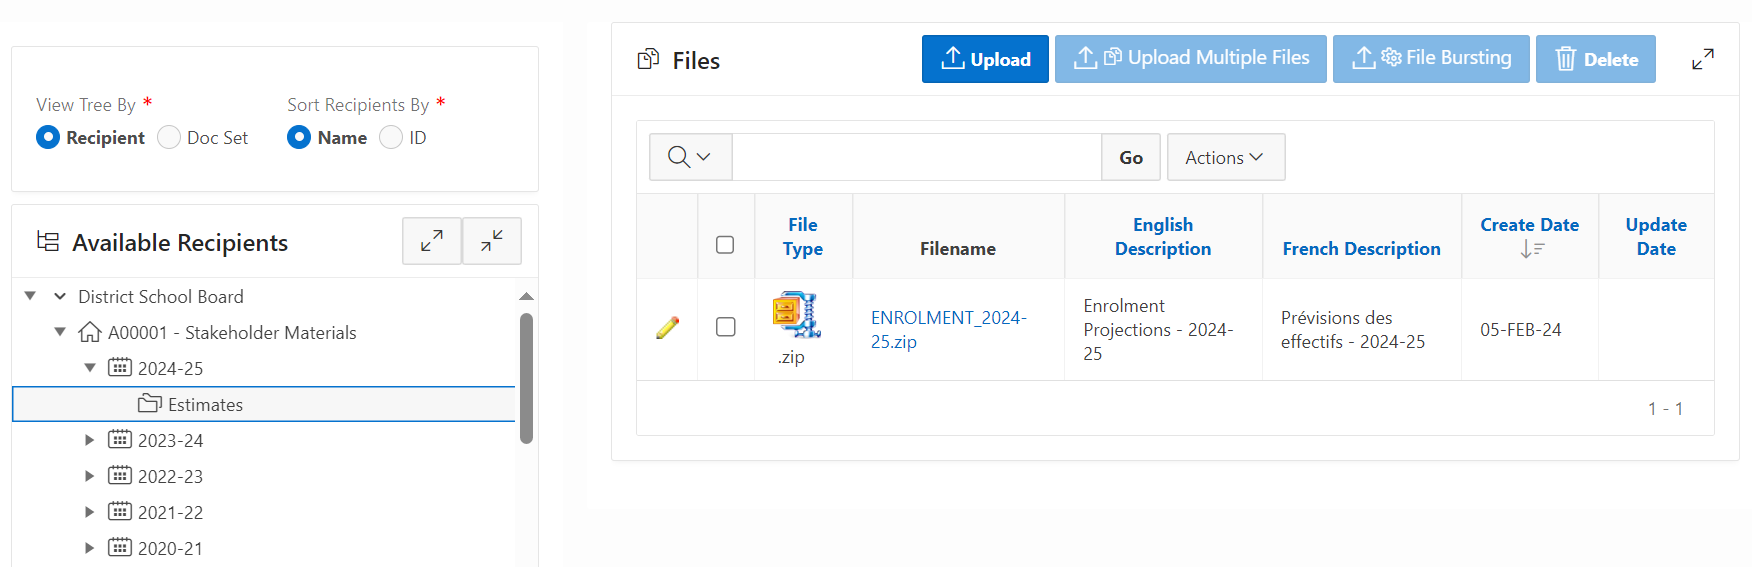
In order to view files related to 2024-2025, the user must select the particular Doc Set they want to see (e.g. 2024-2025 Estimates), by selecting the lowest level folder (e.g. Estimates)
If the user wishes to see all files related to a certain Recipient, they can click on the recipient name, and all the files related to that recipient regardless of Doc Set will be visible.

Please refer to the section Searching, Filtering and Sorting Files for detailed information on how to narrow down the list of files and take advantage of other capabilities of the portal.
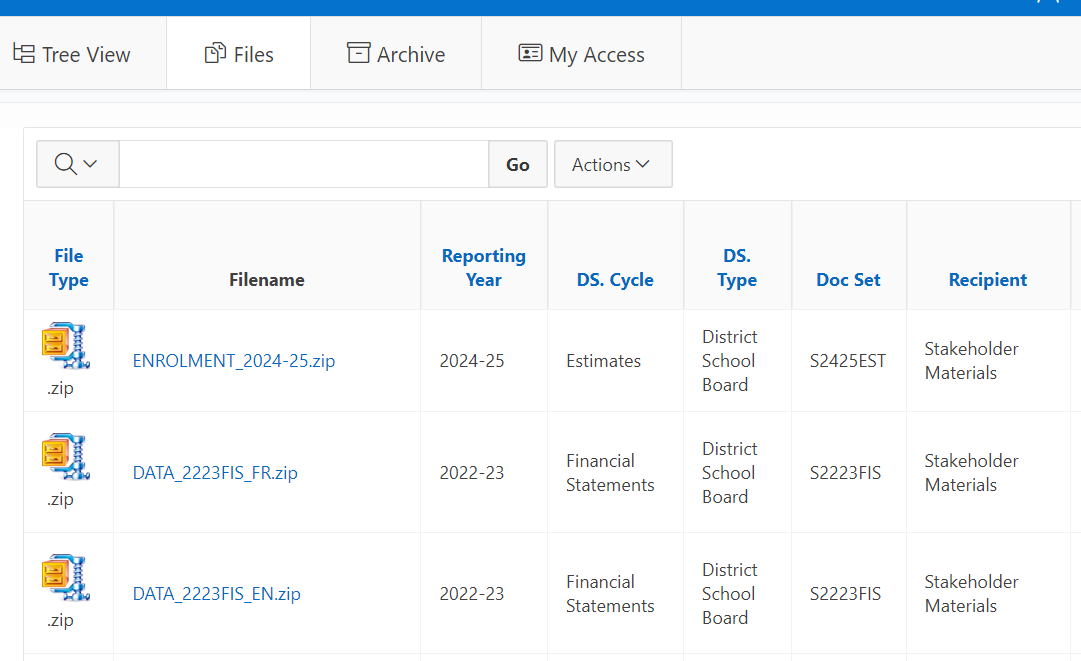
2.2 Files Tab
The "Files" tab shows all the files that the user has access to shown in a single table. By default, the portal shows a list of 100 files per page. If the collection contains more than 100 files, the user can navigate to the next screen by clicking on the arrow found at the bottom right corner of the page. Please refer to the section Searching, Filtering and Sorting Files for detailed information on how to narrow down the list of files and take advantage of other capabilities of the portal.
2.3 File Information
Each file in the portal will have information attached to it in order to help users understand the content that the file contains. There are a number of fields in the portal that are used to hold this information.
Note!
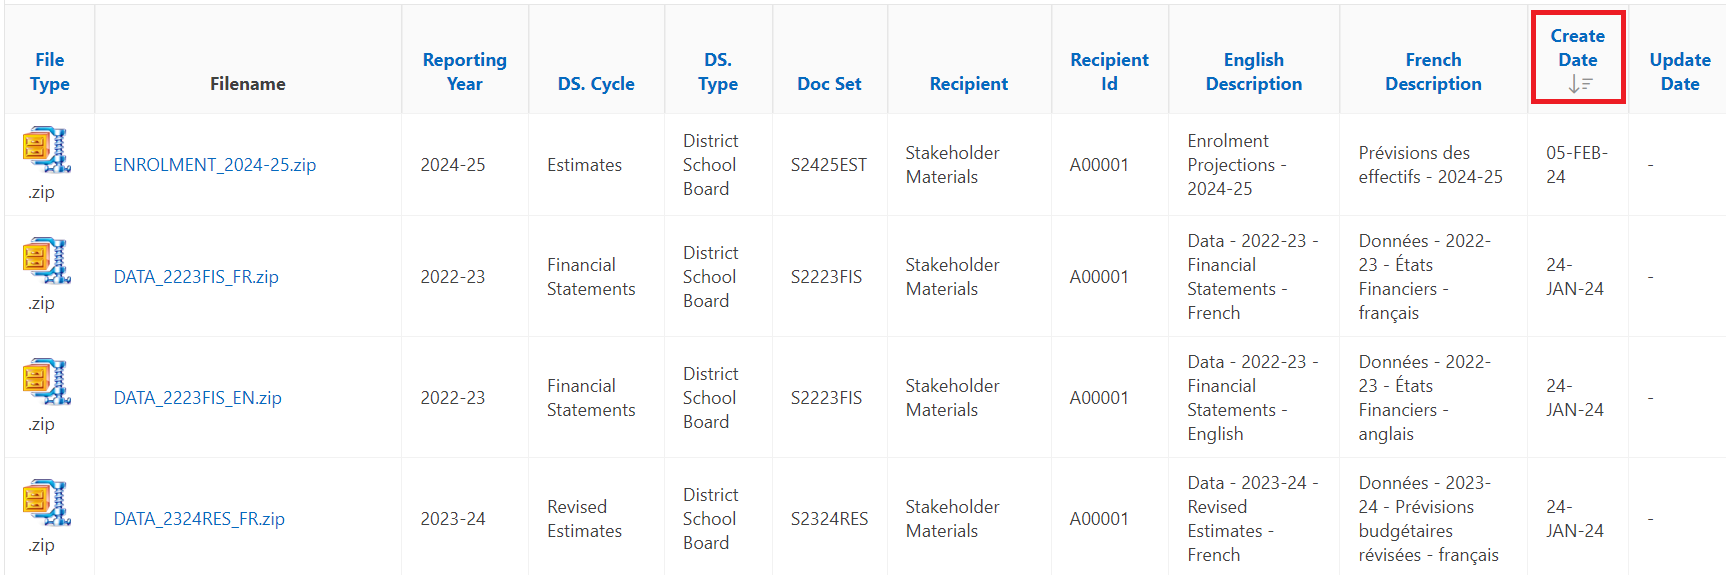
Depending on whether the user is viewing the file list in the "Tree View" tab or the "Files" tab the number of fields differs. The table below shows the fields that describe each file and describes what each of the fields refers to.
An "x" indicates that the field is included in that view.
| Field Name | Tree | Files | Description |
|---|---|---|---|
| File Type | x | x | The type / extension of the file (i.e. .zip, .pdf, .docx, .xlsx) |
| Filename | x | x | The name of the file (i.e. what will the file be named on your machine once downloaded - i.e. DATA_1516FIS_FR.zip) |
| Doc Set | x | x | Document Set ID in the system which is the short form combination of Document Type, Year and Cycle that the document relates to - i.e. S1718EST is a School Board document for the 2017-18 Estimates cycle |
| English Description | x | x | The description of the file in English |
| French Description | x | x | The description of the file in French |
| Create Date | x | x | The date the file was uploaded to the system |
| Update Date | x | x | The last time the file was changed in the system (if this matches the Create Date, then there has been no changes to the file) |
| Reporting Year | x | The reporting year that this file is related to (i.e. 2017-18 means that the file relates to the 2017-18 school year) | |
| DS. Cycle | x | The Doc Set cycle that this file relates to (i.e. Estimates) | |
| DS. Type | x | The Doc Set type that this file relates to (in most cases District School Board) | |
| Recipient | x | The name of the recipient the file relates to (i.e. the name of the school board). Since stakeholder files are for all school boards, the recipient for these will always be "Stakeholder Materials" | |
| Recipient ID | x | The system ID of the recipient (i.e. B66141 or A00001) |
3 Searching, Filtering and Sorting Files
When the user has navigated to any screen that shows a list of files, the user can utilize a number of different methods to get to the file they are looking for. This is especially useful when looking at the “Files” tab that may contain a large number of files.
3.1 Search
The search capabilities allow the user to narrow down the list of files by typing in a search string into the search bar and hitting “Enter” on the keyboard or clicking the “Go” button. The search is performed on the entered string and returns all files that contain that string in ANY of the fields.
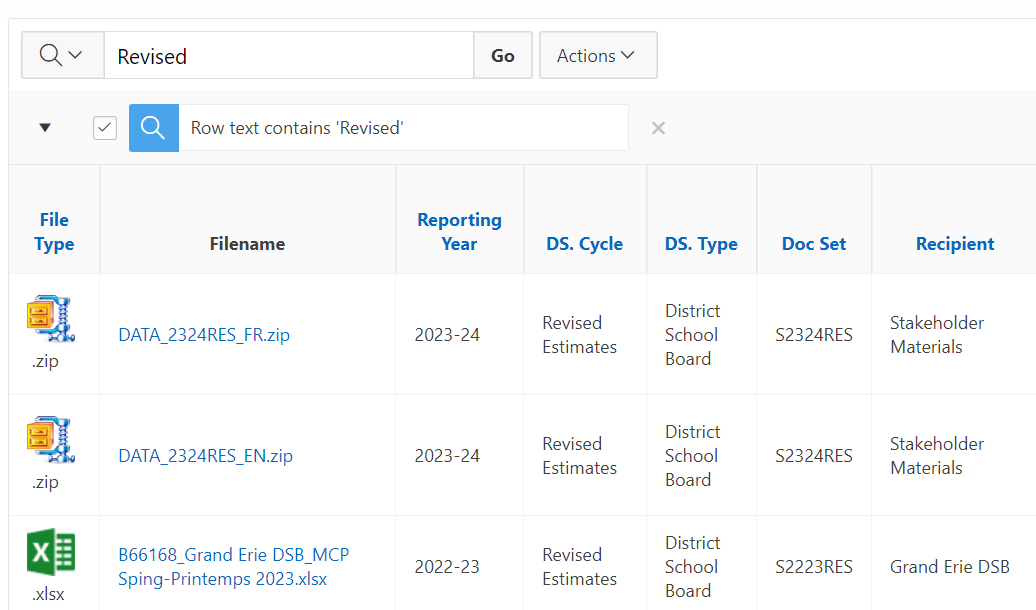
In other words, if a user wanted to narrow down a large number of files below to only show files relating to Revised Estimates cycles, they could search for the term "Revised". The screen above now shows the search term under the Search Bar (e.g. "Row text contains 'Revised'") and the screen shows all the files that have the word “Revised” in any of the fields.
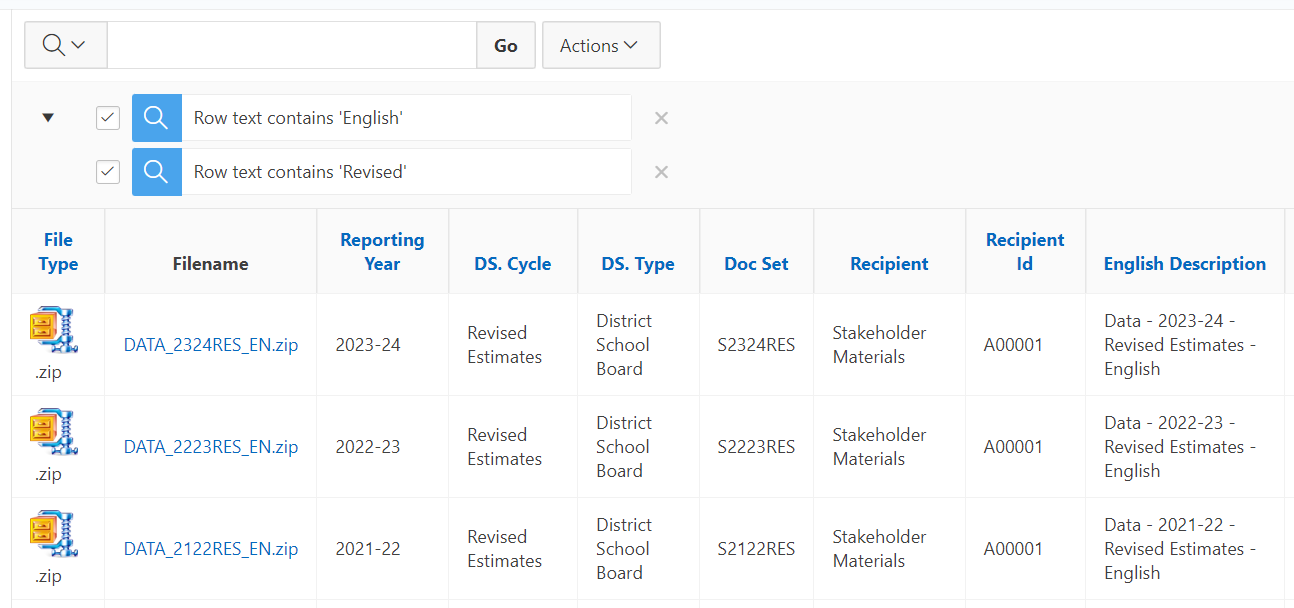
If the user then wanted to further narrow down the search to show only files that are in English, they could type “English” into the search bar and search again. This narrows the list even further, and both the search terms are shown under the search bar. Every time a user runs the search another term is added to the list.
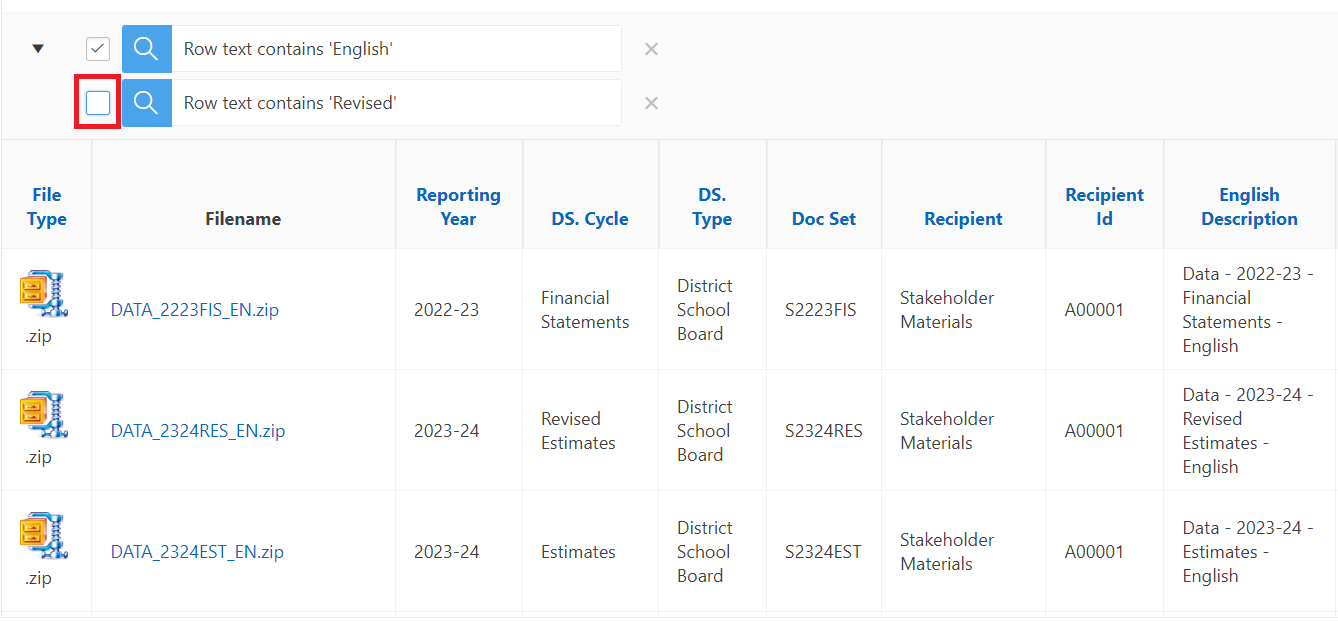
If the user wants to widen the search again, they can either uncheck the search terms or completely delete them. For example, if the user wants to see all English documents, all they would have to do is uncheck the box next to "Row text contains 'Revised'", or click the red "X" next to it to remove the search term. In the case below, the user has unchecked the box, and if need be could quickly filter by the term "Revised" once again, saving them the need to re-type the term in the search box.
Note!
Note that having a search filter on will continue even if the user navigates to other pages. For example, if the user still had the "English" term in place, and they went into a different folder, they would only see files that contained the text "English" in one of the fields.
3.2 Basic Filter
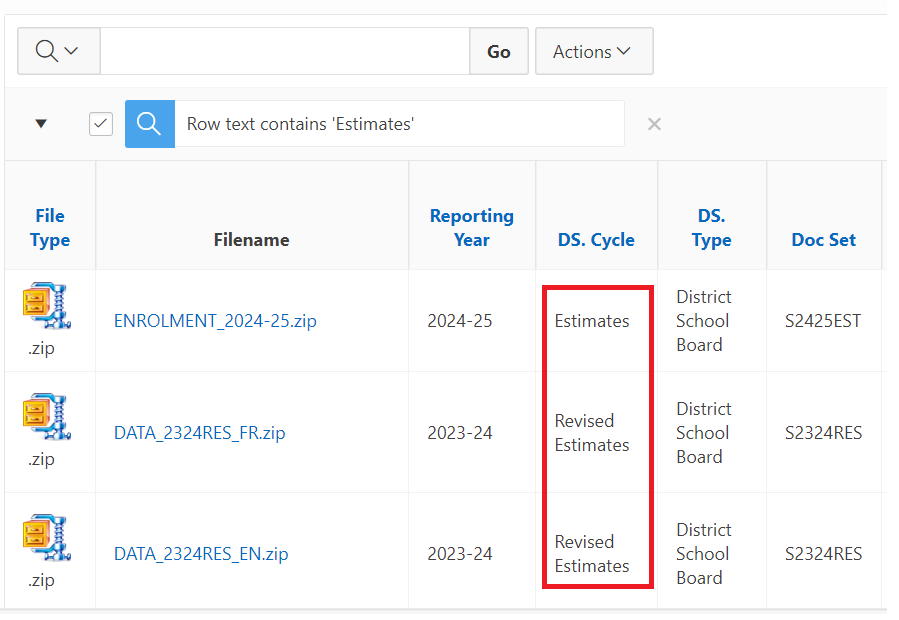
Similar to the search capabilities, the filter functionality allows the user to narrow down the list of files. However, while the search capability looks through all fields, the filter capability allows the user to be more specific by focusing on selected fields and narrowing down the terms. For example, if a user was to search for “Estimates” while looking at a list of all files, they would get files related to both Estimates and Revised Estimates cycles due to the fact that the word “Estimates” is part of both phrases.
In order to make sure they are only getting files relating to the estimates cycle, the user would filter on the field "DS. Cycle" having the value of "Estimates". A quick way to filter is by selecting from a list of available items in the drop down of a field. In the example above the user would click on the field named "DS. Cycle" which would give them a list of items to choose from. This drop down list below contains all the unique values under that field that are currently in the portal.
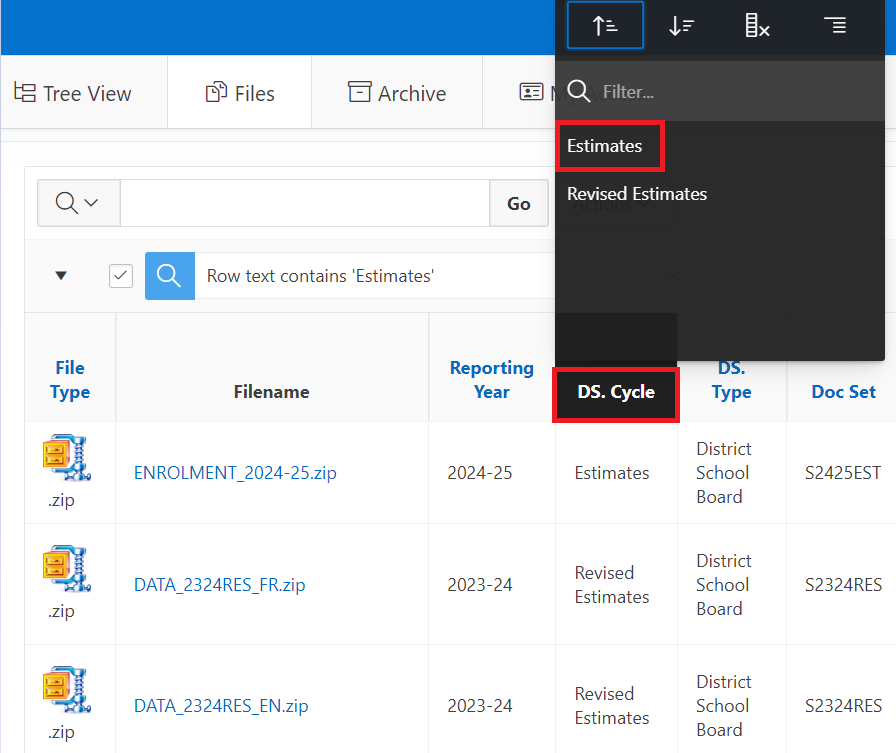
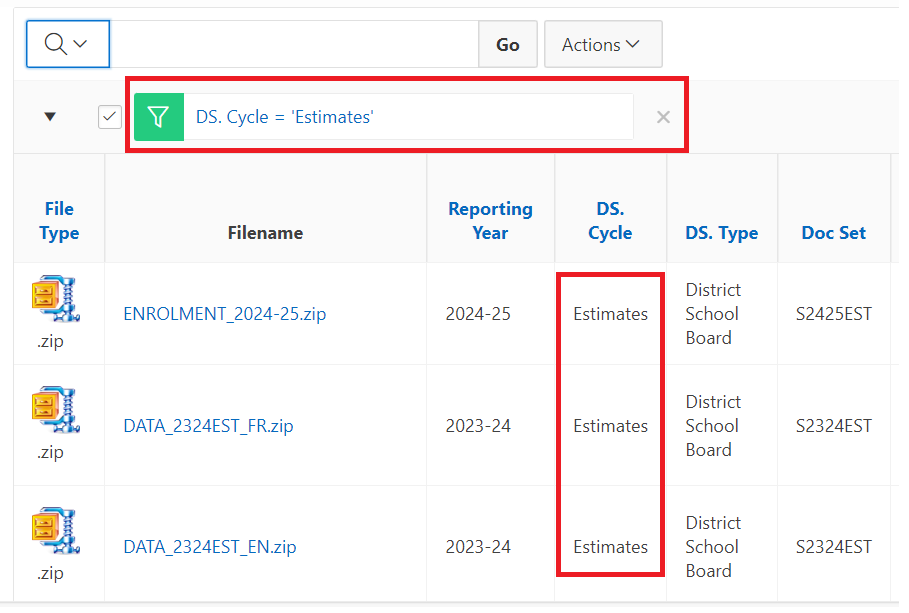
Once the user clicks "Estimates" the filter is applied and the list shows only files related to the "Estimates" cycle. Note the difference between the filter applied in the search - "Row text contains 'Estimates'" and the filter below "DS. Cycle = 'Estimates'".
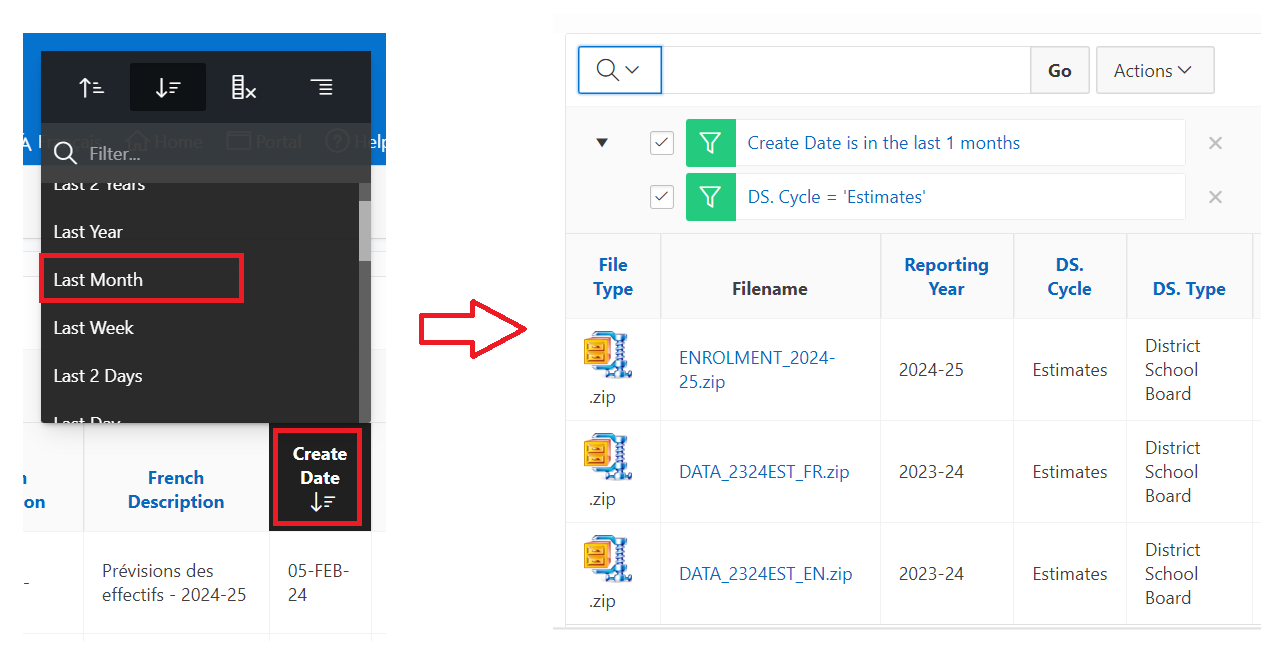
The user can further narrow down the list by applying additional filters. One of the very useful filters is the date filter. For example, if the user wants to see only the Estimates files that were uploaded in the past month, they can quickly filter on the "Create Date" column and select "Last Month" from the drop down list.
3.3 Advanced Filter
The portal allows for more advanced filtering as well. The advanced filters can be applied by going to Actions > Filter

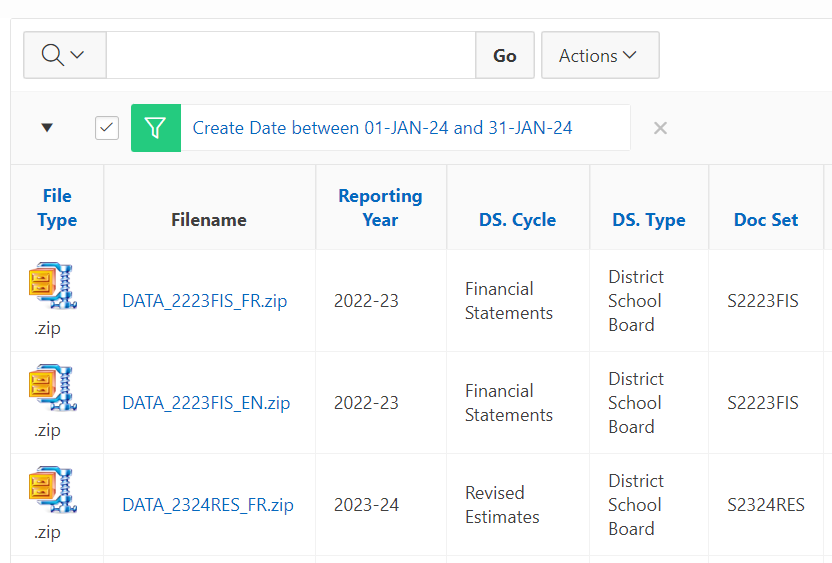
This gives the user the ability to filter on any of the columns using more advanced techniques. One example is filtering for files that were uploaded during a certain time. For example, if the user wanted to see all files that were uploaded in January 2024, they could filter based on the Create Date between January 1st and January 31st 2024.
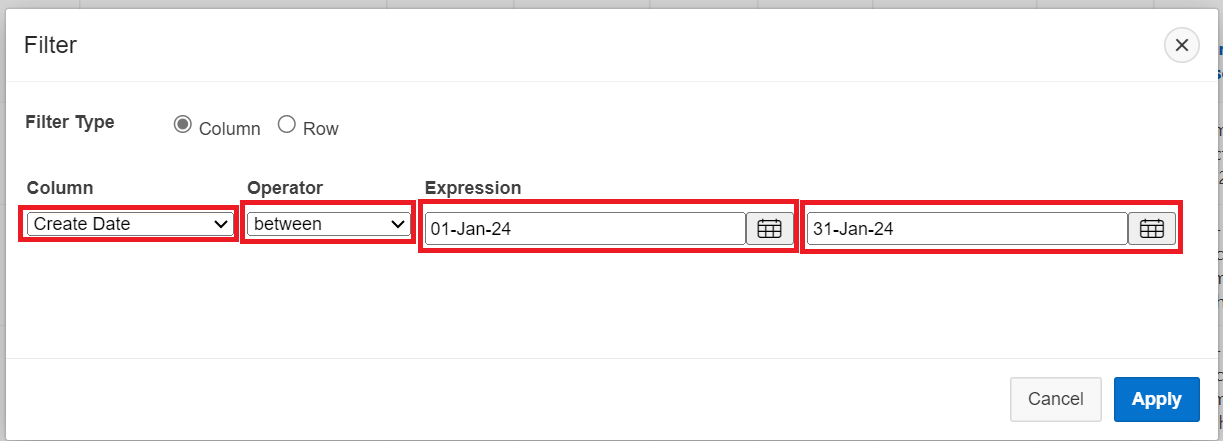
The expression would be shown under the search bar and the results filtered accordingly.
3.4 Sort
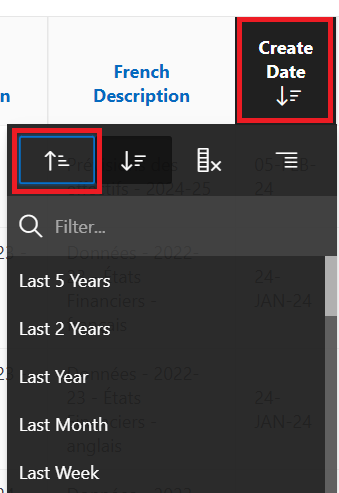
By default, the files are sorted by Create Date (newest files on top) with the newest 100 files being shown on the first page. An arrow next to the “Create Date” field shows that this is the field currently being sorted by, and the arrow pointing downwards means that it is sorting in a descending order (newest to oldest).
If the user wants to change the sort order, for example sort by "Create Date" ascending (oldest to newest), the user can click on the title of the field and click on the arrow pointing up. The screen now shows the files with the oldest files on top.
To sort by another field, the user would simply click the title of the other field and click one of the two arrows from the popup.
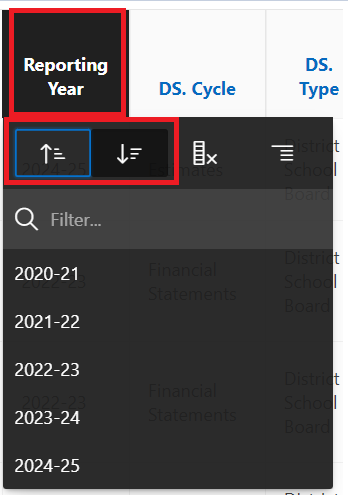
In the example above, the sorting is now being done on the "Reporting Year" field descending, with the newest reporting year files shown at the top. The arrow has now moved from the "Create Date" field to the "Reporting Year" field to indicate this.
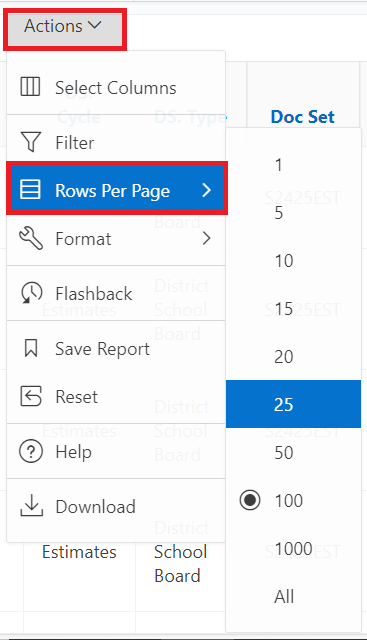
3.5 Rows per Page
By default the screen will show 100 rows (files) per page. This can be changed by going to Actions > Rows Per Page and selecting a different number.
4 Downloading Files
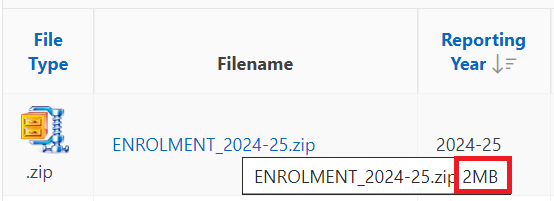
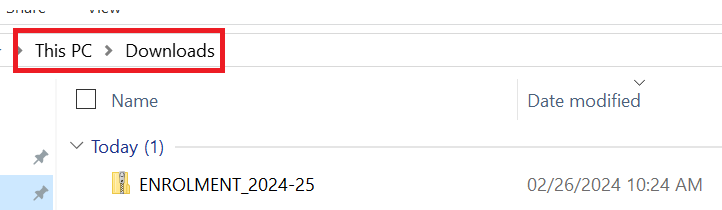
Once the user has found the files that they want to download they can download it by simply clicking on the file name link, found in the "Filename" field. Please note that the portal only allows for the downloading of one file at a time. In general, if a dataset contains a large number of files (such as stakeholder data) the files will be packaged into a zip file (this is easy to tell by looking at the "File Type" field which will indicate ".zip"). In order to see how large a file is before downloading it, the user can hover their mouse over the file name. In the example below the file named "ENROLMENT_2024-25.zip" is 2MB in size.
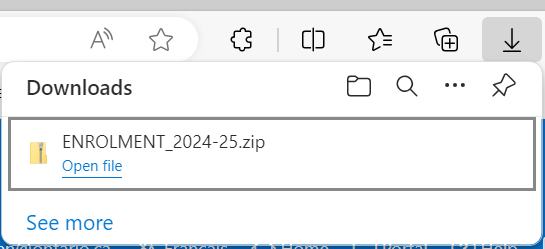
As mentioned, clicking the file name link (e.g. ENROLMENT_2024-25.zip) will start the download process of the file. Depending on which browser the user is using as well as their browser settings they will have a slightly different experience. For example, in Microsoft Edge, downloading a file automatically opens up the download tab and saves the .zip to the "Downloads" folder on the user's computer.
4.1 Opening Zip Files
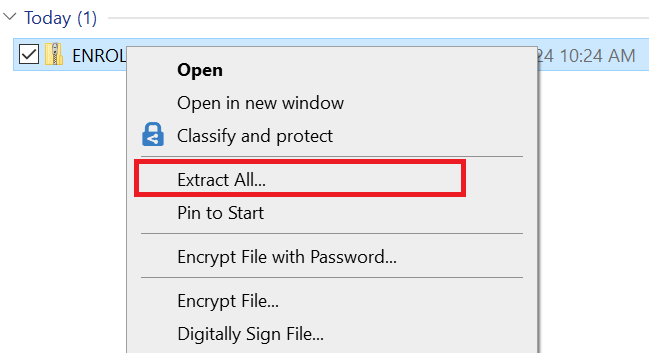
As mentioned before, zip files are used to create collections of data into one single file. Computers using the Windows operating system should all have a build in utility to work with .zip files. The user can contact their IT department in the case that they are not using Windows or do not see a zip utility. In order to open files found within zip files, the user can simply double click on the Zip file in the place where it is downloaded, and copy the necessary files out. Another option is to right-click the Zip file and select "Extract All" (on Windows computers). This will create a new folder which contains all the contents of the Zip file.
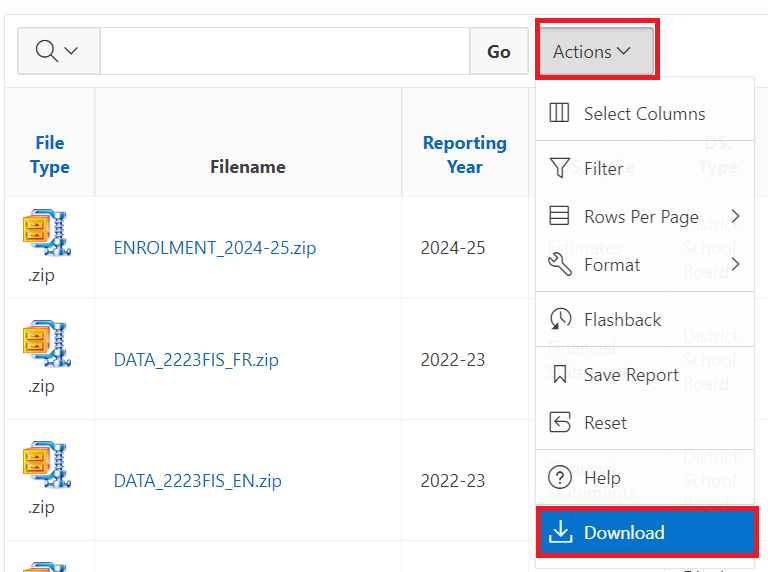
4.2 Actions > Download
Please note that clicking the "Actions" button and selecting "Download" will NOT download any files. This will only download the list of files that the screen is showing at that time.
Changelog
| Version | Date | Changed by | Description |
|---|---|---|---|
| 1.0 | February 2019 | LFIB | Create document |
| 1.1 | February 2019 | LFIB | Update after review |
| 1.2 | March 2019 | LFIB | Finalized version |
| 1.3 | February 2024 | EFIS Team | Updated screenshots |
| 1.4 | March 2025 | Angelie S. | Modified "Contact Us" footnote |